Add a floorplan to a Site map, switch between building floors, and place registered Wi-Fi access points on the correct floor. The same floorplan can provide context on an Asset's location map.
A floorplan is an image aligned to the geographic map. Asset GPS pins retain their reported locations, including positions outside the building or Site. Selecting a floor does not assign Assets to that floor. Access point (AP) floor placements are assigned manually.
The screenshots use an example Site with two floors. Names and the controls available to you may differ depending on your permissions and the Site's setup.
In this guide
Before you start · Quick start · Create a floor · Align the plan · Map layers · Place APs · Asset maps · Manage floors · Replace or restore images · Troubleshooting · FAQs
Before you start
- Open a Site you can access. Creating floors, uploading images, aligning floorplans, and assigning APs require permission to manage that Site.
- Prepare one PNG or JPEG image per floor. Files must be no larger than 10 MiB and 40 megapixels, with neither side exceeding 20,000 pixels. Export PDF or CAD plans to PNG or JPEG first.
- Use a clear, proportionally accurate plan. Trim unnecessary borders and title blocks before the first upload; these are part of the image's size when you set its scale.
- Know the building's location, orientation, and approximate dimensions. A known wall length or a correctly scaled plan helps you align it.
- Register the APs you want to place using the Site's Access Points controls.
Quick start
- Open Sites, select the Site, and go to Overview → Site Map. Use the map's expand control for more working space.
- Select Manage Floors, create a floor, and upload its image.
- Position the center pin, set Scale and Rotation, then select Save Alignment.
- Repeat for each floor. Use View → Floor to switch between them.
- Select Access Points, choose a floor, and use Place on Floor for each AP. Select Save Floor Placement after positioning its preview pin.
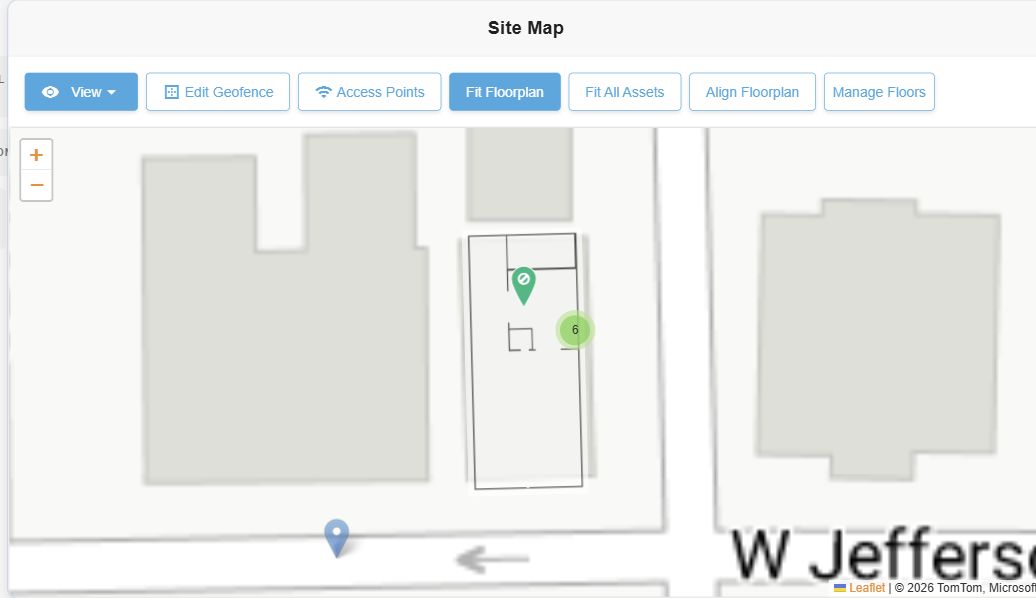
Site Map controls. The geofence layer is hidden in this example to make the floorplan easier to see.
1. Create a floor and upload its plan
- In Site Map, select Manage Floors.
- If the Site has no floors, enter a Floor name and select Create Floor. If it already has a floor, select Add Floor first.
- Give the floor a recognizable name, such as Ground Floor or Floor 2 - Office.
- Use Upload floorplan for [floor name] to choose its PNG or JPEG image. Wait for the upload to finish.
- Complete the alignment described below. A new image needs its first saved alignment before AP placement is available.
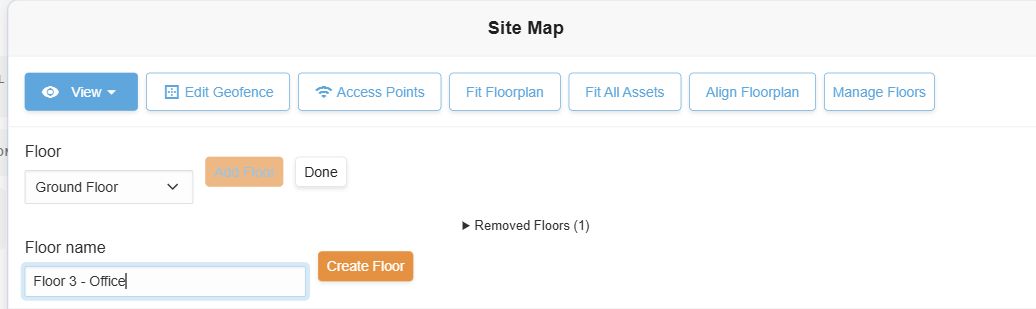
Enter a floor name, then select Create Floor. This example shows an unsaved form.
2. Align the floorplan to the map
ARMOR positions the image using its geographic center, width, and rotation. It does not automatically fit the plan to the building outline or the Site geofence.
- For an existing plan, select the desired floor in View, close the menu, and select Align Floorplan. Alignment controls appear automatically after a floor's first image upload.
- Drag the center pin to move the whole image over the building. Dragging the map itself pans the map.
- Set Scale to the real-world width of the entire image, in meters. Height changes proportionally. For an image cropped exactly to a building that is 30 meters wide, start with 30.
- Adjust Rotation until walls and building edges line up with the map.
- Use Fit Floorplan and the map's + and − zoom controls to inspect the result. Adjust opacity in View if you need to see the base map through the plan.
- Select Save Alignment. Reopen the plan and check several known points, then verify any placed APs.
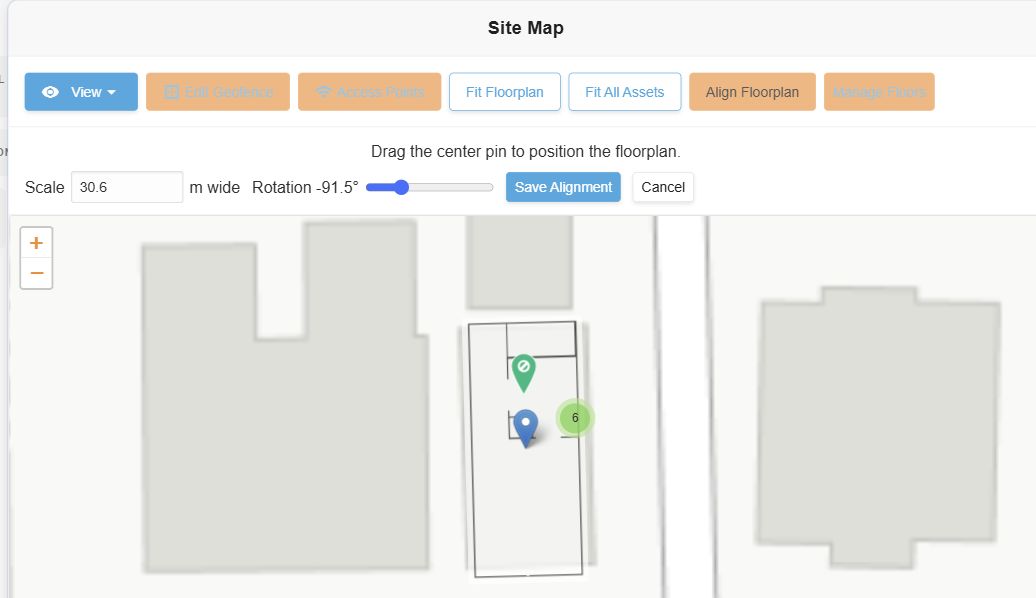
Scale means image width in meters. Rotation turns the plan; the center pin moves it.
Cancel discards alignment edits when the floor already has a saved alignment. For a newly uploaded image, save its first alignment before continuing. Moving, rotating, or scaling an aligned plan also moves the map positions of APs attached to that plan; their positions within the image remain attached to it.
3. View floors and map layers
Select View above the Site map to choose the layers you need:
| Control | What it does |
|---|---|
| Floorplan | Shows or hides the selected floor's image. |
| Floor | Switches the displayed floor when the Site has more than one. One floorplan is displayed at a time. |
| Opacity | Makes the plan more transparent or more solid. Lower opacity helps with alignment. |
| Geofence / Assets / Access Points | Shows or hides these map layers independently. |
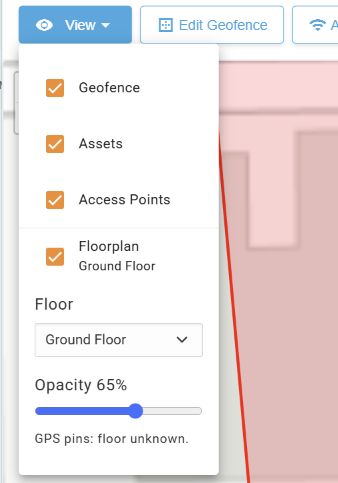
- Fit Floorplan centers and zooms to the selected plan.
- Fit All Assets brings available Asset locations into view, including Assets outside the Site footprint. Keep the Assets layer enabled to see their pins.
- An Asset pin can appear over the plan because its GPS coordinates fall there. This does not confirm which floor it occupies or identify an exact indoor room.
- With a floorplan displayed, AP pins show assignments to that floor plus unassigned APs with geographic coordinates. APs assigned to another floor are hidden. Hide the floorplan to see AP placements across floors on the geographic map.
4. Place an access point on a floor
- Select Access Points above the Site map.
- Choose the target floor in the AP panel's Floor selector. That floor must have an uploaded image and saved alignment.
- If the AP is not registered, use Add Access Point and save its details first. AP registration and floor placement are separate steps.
- Find the AP in the list and select Place on Floor.
- Click inside the floorplan image at the AP's physical position. A preview pin appears. Drag it within the plan to adjust it. For an AP already placed on the selected floor, the preview starts at its saved position.
- Select Save Floor Placement. Confirm the AP's floor name appears under its name, then close the AP panel using its own × control.
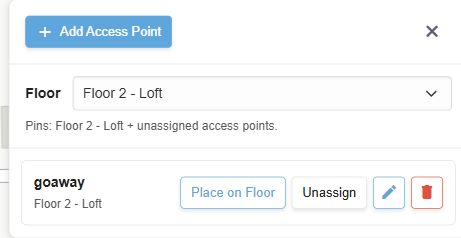
The floor label under each AP confirms its saved assignment. The list can include APs assigned to other floors.
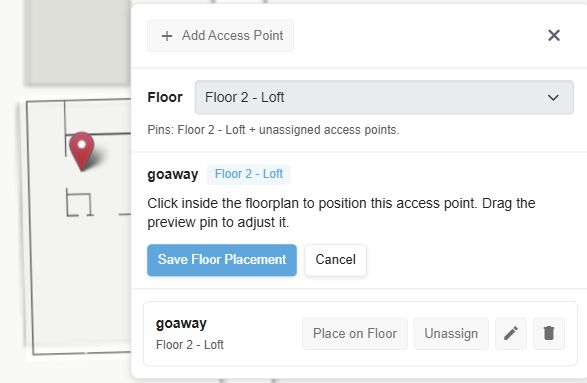
The preview is saved only when you select Save Floor Placement. Select Cancel to discard the placement preview.
To move an AP to another floor, choose that floor and repeat Place on Floor. Each AP has one saved floor assignment. To remove only the floor assignment, select Unassign; the registered AP remains, and its original geographic coordinates can be used on the map again. The trash button deletes the AP registration and is a different action.
Floor placement does not overwrite the AP's original latitude/longitude and does not automatically place Assets that observe the AP onto its floor.
5. Use a floorplan on an Asset overview
- Open an Asset and select Overview. Find its GPS Map or Last Observed Location area, depending on the Asset screen.
- When the Asset's associated Site has floors you can access, select View to choose a floor, change opacity, or show/hide the floorplan and AP layer.
- Select Fit Floorplan to inspect the building. Select Fit Location to return to the Asset's available geographic location or displayed route, including locations outside the Site.
- On maps with a Days selector, choose the last known location, a time range, or an available trip to review geographic history.
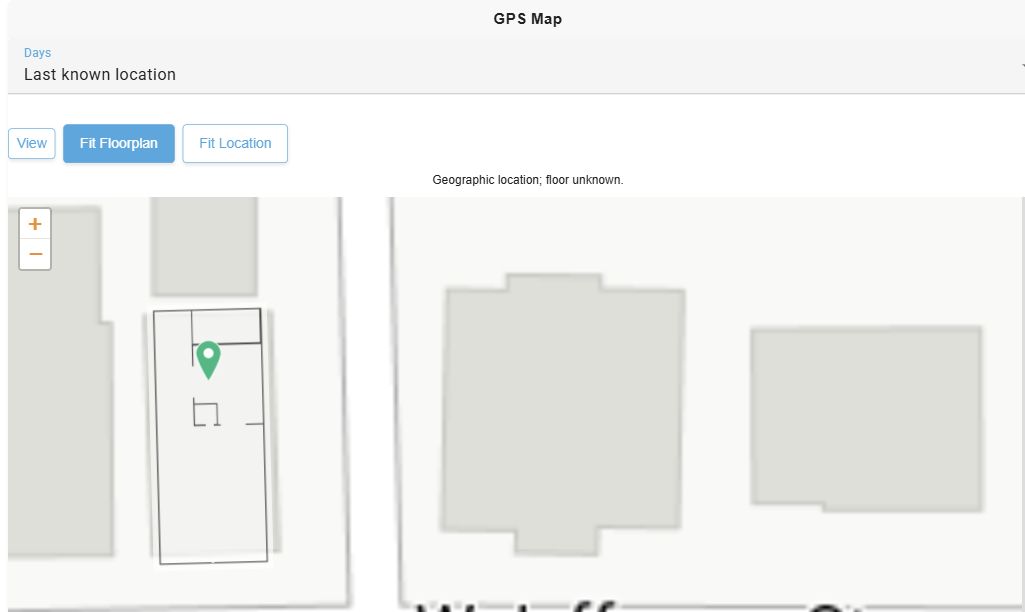
Asset maps provide read-only floorplan and AP context. An Asset outside the Site may be off-screen while viewing the floorplan; use Fit Location to find it.
Manage floor definitions, alignment, images, and AP assignments from the Site screen. Asset history shows reported geographic positions against the current floorplan; it does not reconstruct an older building layout. If the Asset has no recorded coordinates, ARMOR may show Location unavailable rather than invent a location from its Site or an AP.
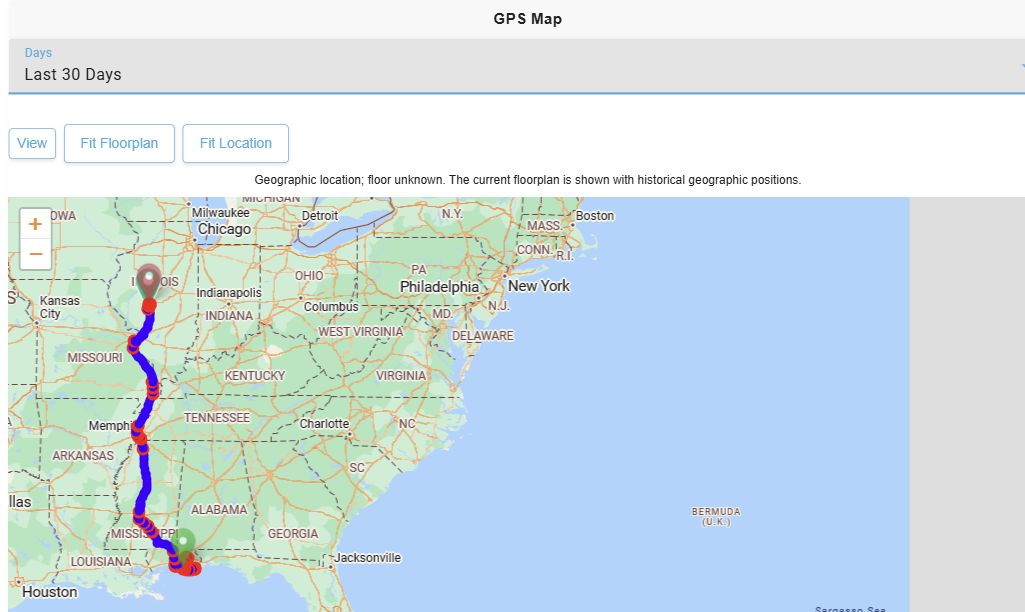
Historical routes remain geographic. At this zoom level, the building floorplan is too small to read; Fit Floorplan returns to the building.
6. Rename, order, remove, or restore floors
On the Site map, select Manage Floors and choose the floor you want to maintain.
- Rename or reorder: edit Floor name or Display order, then select Save Floor Details. Smaller display-order numbers appear earlier in the floor list.
- Add: select Add Floor, create the floor, upload its image, and align it independently.
- Remove: first reassign or unassign every AP on that floor. Then select Remove Floor. Removal hides the floor from the normal list and retains it for recovery.
- Restore: expand Removed Floors and select Restore Floor beside the desired floor. Check its image and alignment. APs you previously unassigned or moved need to be placed again as appropriate.
- Select Done to close floor management.
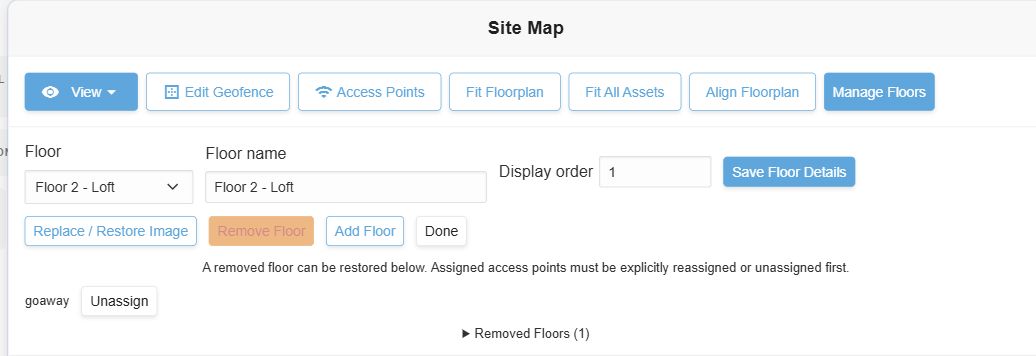
Remove Floor is disabled in this example because an AP is still assigned to the selected floor.
7. Replace a floorplan or recover an earlier image
- Open Manage Floors, select the floor, then select Replace / Restore Image.
- Choose a file under New floorplan, or select an Earlier image when saved revisions are available.
- Compare the current and proposed images. Check the image boundaries, orientation, scale, room layout, and margins.
- Choose the appropriate option below, then select Save Replacement Image or Restore Earlier Image.
- Verify the result on the map. If you reset for a different plan, save its alignment and place the APs again.
| Option | When to use it |
|---|---|
| Keep the current alignment and AP placements (same geometry) | Use for an image with the same layout, extent, orientation and margins, such as a clearer export of the same plan. Confirm the comparison checkbox. Matching dimensions or aspect ratio alone do not prove compatibility. |
| Reset alignment for a different plan | Use when layout, cropping, image proportions or geometry changed. Reassign or unassign every AP first. You must align the new plan and place APs again. |
| Recover the earlier image and its saved alignment | Appears when selecting an earlier image. Reassign or unassign every AP first. Recovery restores that image's saved alignment, when available; it does not restore earlier AP assignments. |

Different aspect ratios require a reset. Even when aspect ratios match, check the actual geometry before keeping AP placements. Cropping borders from an existing image changes where an AP lies within the image and can require a reset. Use Cancel Replacement to leave the existing image unchanged.
Troubleshooting
| What you see | What to check |
|---|---|
| No floorplan controls | Confirm the feature is enabled and you can access the Site. Asset floor controls require an associated Site with floors. Editing controls appear only for users permitted to manage the Site. |
| Floorplan is missing or faint | Choose the correct floor, enable Floorplan in View, increase opacity, and select Fit Floorplan. An image without its first saved alignment needs a Site manager to align it. |
| Plan is too small or misplaced | Use Fit Floorplan, expand the map, and zoom in. Check Scale in meters, Rotation, center position, and whitespace inside the original image. Hide geofence shading temporarily if it obscures the plan. |
| GPS pin is outside the floorplan | This can be the reported geographic location. Use Fit All Assets on the Site map or Fit Location on the Asset map. Also check the observation time and floorplan alignment. |
| AP pin disappears after changing floors | Check its floor label in Access Points. APs assigned to another floor are hidden while a floorplan is displayed. Hide the floorplan for a geographic view across floors. |
| Place on Floor is unavailable | Check permissions and save the selected floor's alignment. Finish any open AP form or placement operation. If placements failed to load, select Reload Placements before editing. |
| Click inside the floorplan image | The placement click was outside the image boundaries. Select Fit Floorplan and place the preview inside the image. |
| Remove Floor or image reset is blocked | Reassign or unassign all APs attached to that floor, then reload floor management. Resetting image geometry and removing a floor both require no assigned APs. |
| Upload is rejected | Use a valid PNG or JPEG within the size and pixel limits. Export again if the file is incomplete; renaming a PDF's extension does not convert it. |
| Save fails after another operator's change | Close and reopen the Site map, review the latest floor and placements, and retry deliberately. Use Reload Placements for placement-loading errors. A geometry-change message requires reopening the Site map. |
Frequently asked questions
Can I show several floorplans stacked together?
Multiple floors can be stored, but the map displays one selected floorplan at a time. Use the Floor selector to change levels.
Does this provide indoor positioning or identify an Asset's floor?
No. Asset pins show geographic locations with floor unknown. Manual AP placement adds floor context but does not automatically determine an Asset's floor or room.
Does aligning a plan change the Site geofence?
No. The geofence is managed separately with Edit Geofence. Floorplans also do not clip Asset locations to the building footprint.
Can I edit floors from an Asset overview?
No. Use the Site map to maintain floors, images, alignment, and AP assignments.
What happens to the original AP coordinates?
They remain stored. The floor placement controls where the AP is drawn while assigned; unassigning allows its original geographic position to be used again.
Was this article helpful?
That’s Great!
Thank you for your feedback
Sorry! We couldn't be helpful
Thank you for your feedback
Feedback sent
We appreciate your effort and will try to fix the article